Updating Firmware version and Uploading Certificates
Learn how to update the firmware on your WiFi boards, and how to upload SSL Root Certificates.
Overview
The IDE 2 comes with two really useful tools: the Firmware Updater for WiFi boards, and the SSL Root Certificates Uploader. The Firmware Updater allows you to choose the firmware version you want to upgrade to (or downgrade to), while the Certificates Uploader allows you to update the SSL root certificates on the board (adding specific domains).
Only Wi-Fi enabled boards can be updated through these tools, and you can find the full list in the compatible boards section just below.
You can download the editor from the Arduino Software page.
Compatible Boards
The following boards are based on the NINA-W10 series from u-blox.
The following boards are based on the ATWINC1500 module.
/* As of Arduino IDE 2.2.0, these boards are no longer supported. Update is still supported via the legacy IDE. See this tutorial for more information.
When to Update Firmware
In most cases, manually updating your board's firmware is not necessary, as it is shipped to work 'out of the box'. But there are some cases where updating it might be useful, for example to correct hardware bugs or to be compatible with a specific setup.
You can read the full changelog of the NINA firmware through the link below:
Arduino Cloud
When you are using the Arduino Cloud, during the device configuration, your board's firmware is automatically updated so that it can utilize features such as OTA (Over The Air) upload.
Python® & Wi-Fi
To access the Wi-Fi module on the Nano RP2040 Connect board using Python® (through OpenMV), you will need to update the NINA firmware to the latest version.
Firmware Updater
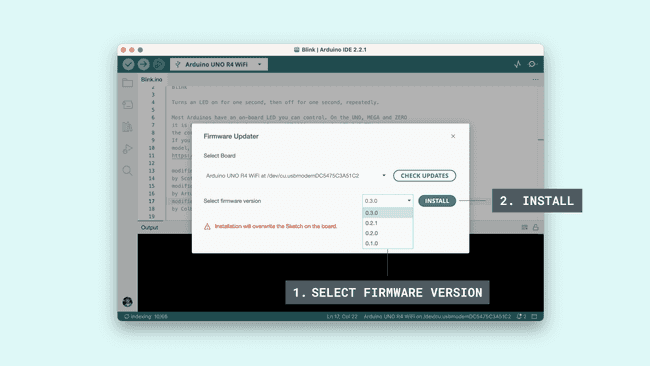
The Firmware Updater tool will overwrite any existing sketch on your board.
To update the Firmware, follow the below steps:
1. Connect your board to your computer.
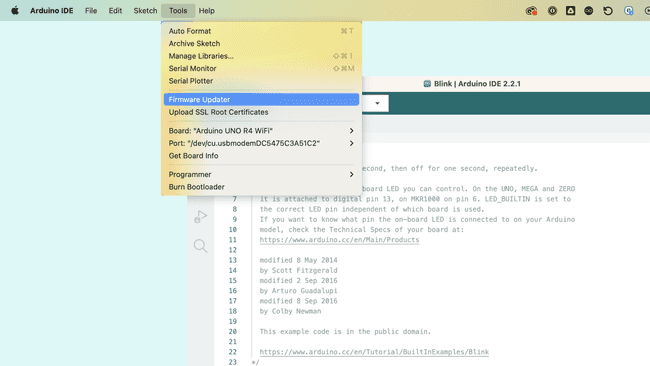
2. Open the Arduino IDE 2, and navigate to Tools > Firmware Updater.
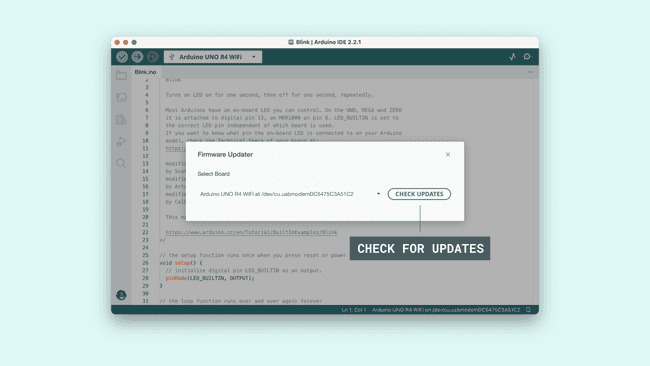
3. A new window will open. Select your board from the drop down menu, and press the button to check for updates.
4. Select the firmware you want to upgrade/downgrade to.
5. Allow some time for the process to finish. If successful, you will see the text:
1Firmware successfully installed.Certificates Uploader
To upload SSL Root certificates to your board, follow the below steps:
1. Connect your board to your computer.
2. Open the Arduino IDE 2, and navigate to Tools > Upload SSL Root Certificates.
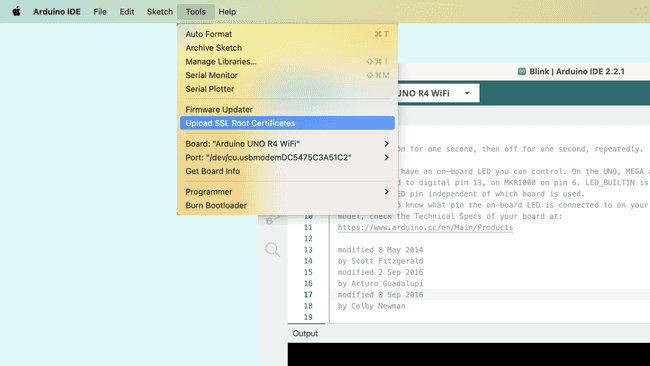
3. A new window will open. Click on the "Add New" and add the URL in the field. Here you can add multiple entries. When you are finished adding certificates, you can select your board from the drop down menu. To upload the certificates, click on the "Upload" button.
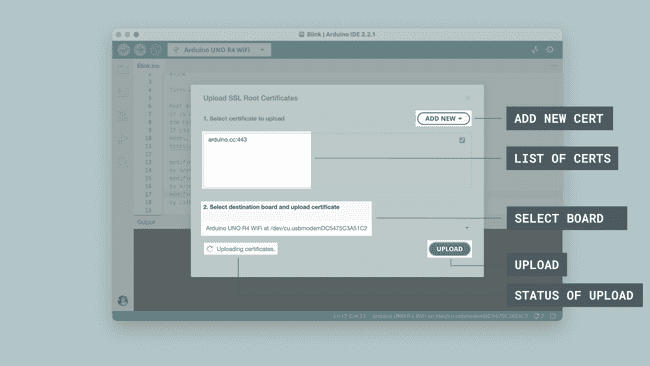
5. The process of uploading the certificates takes some time, and when it is finished, you will see the text:
1Certificates uploaded.Conclusion
In this tutorial, we have step-by-step gone through the Firmware Updater and Certification Uploader tools. Both are developed to be easy to use and to remove complicated steps that is typically associated with firmware updates.
Suggest changes
The content on docs.arduino.cc is facilitated through a public GitHub repository. If you see anything wrong, you can edit this page here.
License
The Arduino documentation is licensed under the Creative Commons Attribution-Share Alike 4.0 license.