09. How To Flash Your Portenta X8
This tutorial teaches you how to flash your Portenta X8 through USB.
Overview
In this tutorial, you will learn how to manually flash your Portenta X8 with the image provided by Arduino. You will flash your board through USB using the Terminal. The instructions below are meant to be used with a Windows Operating System.
Goals
- Learn how to get the required files
- Learn how to set up the correct structure of the files
- Learn how to set up the board
- Learn how to flash the device
Required Hardware and Software
- Arduino Portenta X8
- USB-C® cable (either USB-C® to USB-A or USB-C® to USB-C®)
- Portenta Family Carrier (Optional):
- Arduino Portenta Breakout Board
- Arduino Portenta Max Carrier
- Arduino Portenta Hat Carrier
Instructions
Arduino's Download Repository
Go to Arduino Download repository, and a compressed
.tar.gz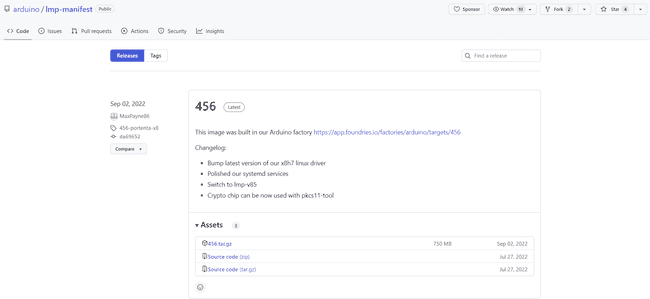
Please extract the files after you have downloaded the compressed file. The extracted contents have the following structure.
1Unzipped folder2├── imx-boot-portenta-x83├── lmp-partner-arduino-image-portenta-x8.wic.gz **(Compressed)**4├── mfgtool-files-portenta-x8.tar.gz **(Compressed)**5├── sit-portenta-x8.bin6└── u-boot-portenta-x8.itbAfter verifying these files are available, you will need to decompress
mfgtool-files-portenta-x8.tar.gzlmp-partner-arduino-image-portenta-x8.wic.gz.wic1Unzipped folder2├── mfgtool-files-portenta-x8/3├── imx-boot-portenta-x84├── lmp-partner-arduino-image-portenta-x8.wic5├── lmp-partner-arduino-image-portenta-x8.wic.gz **(Compressed)**6├── mfgtool-files-portenta-x8.tar.gz **(Compressed)**7├── sit-portenta-x8.bin8└── u-boot-portenta-x8.itbSetting the Portenta X8 to Flashing Mode
Flashing Mode with Carrier
Connect your Portenta X8 to your carrier of choice, either Portenta Breakout, Portenta Max Carrier, or Hat Carrier, via High-Density connectors. After connecting the Portenta X8, you must set the
BOOTBTSELBOOT/BTSELFor the Portenta Max Carrier, set the
BOOT SELBOOT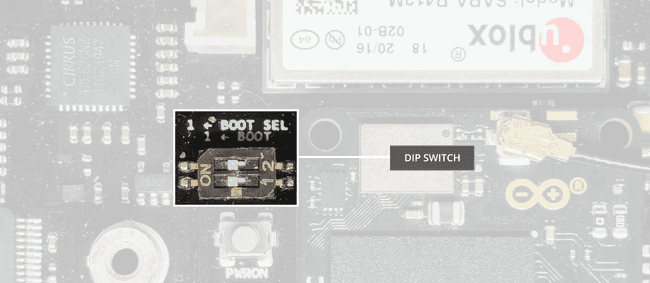
For the Portenta Breakout, the
BT_SELBOOT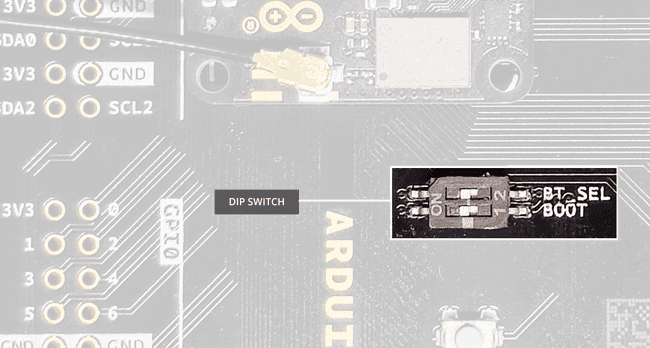
For the Portenta Hat Carrier, the
BTSEL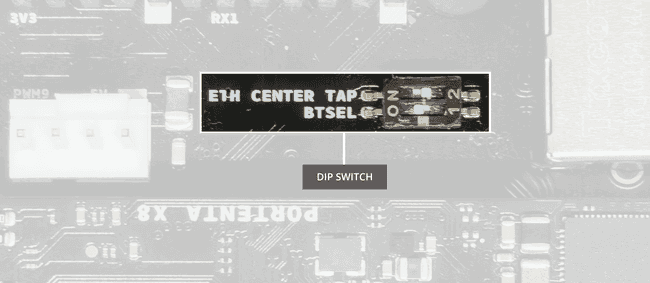
The
ETH CENTER TAPYou must connect one USB-C® end to the Portenta X8 and the other (USB-C® or USB-A) to your computer. With this, the Portenta X8 is ready to begin the flashing process.
Flashing Mode without Carrier
It is recommended to flash the board with the carrier. If it is not possible, we provide an alternative procedure for advanced users only implying the full flash memory erasing. If something goes wrong during the procedure, you might not be able to recover the board. Proceed with caution.
If Portenta Breakout or Portenta Max Carrier is unavailable, the Portenta X8 can be configured for programming mode using a few command lines inside the Portenta X8's terminal via ADB. Please use the following commands in exact sequence while in the root environment with root permission.
1echo 0 > /sys/block/mmcblk2boot0/force_ro1dd if=/dev/zero of=/dev/mmcblk2boot0 bs=1024 count=4096 && sync1echo 0 > /sys/block/mmcblk2boot1/force_ro1dd if=/dev/zero of=/dev/mmcblk2boot1 bs=1024 count=4096 && syncThis sequence of commands will allow you to reset Portenta X8's bootloader sector, defaulting the internal bootloader to
uuuFlashing the Portenta X8
To flash the Portenta X8, you need to begin by opening a terminal. Within the terminal, you need to change the directory to where the
mfgtool-files-portenta-x8cd1uuu full_image.uuuIf you have followed the Flashing Mode without Carrier method to flash an OS or a custom image, the
uuuuuuWhen the flashing operation is finished, you should see a similar result as the following figure:
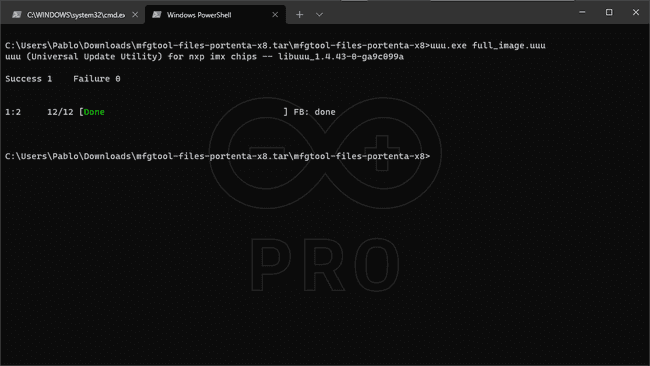
Once you have verified it has successfully flashed the Portenta X8, the
BOOTIf the Portenta X8 was flashed barebone, you will need to recycle the power and be ready with the latest OS image.
After booting, you will need to wait 10 seconds until the Portenta X8 starts blinking Blue LED. The Blue LED indicates it was able to boot successfully.
Conclusion
In this tutorial, you have learned to flash the Portenta X8 by getting the latest image, setting up the adequate file structure and the board, and finally flashing the board with these files.
Troubleshooting
- If you get an error while it is flashing, make sure your USB is correctly plugged in. Reconnect your board and try to flash it again. You may need to go through a few trials before successful flashing.
- If you get an error related to permissions, try to launch the
command as Super User (uuu
).sudo
Suggest changes
The content on docs.arduino.cc is facilitated through a public GitHub repository. If you see anything wrong, you can edit this page here.
License
The Arduino documentation is licensed under the Creative Commons Attribution-Share Alike 4.0 license.