Accessing the Built-in RGB LED on the MKR WiFi 1010
In this tutorial, we are going to find out how to control the MKR WiFi 1010's built-in RGB LED. This component is a really good tool for any type of development: we can use it to prototype a smart light, or perhaps use it as a feedback component.
Introduction
In this tutorial, we are going to find out how to control the MKR WiFi 1010's built-in RGB LED. This component is a really good tool for any type of development: we can use it to prototype a smart light, or perhaps use it as a feedback component.
Goals
The goals of this project are:
- Learn what commands we can use to control the built-in RGB.
- Make the RGB blink in three different colors.
Hardware & Software Needed
- Arduino IDE (online or offline).
- WiFiNINA library.
- Arduino MKR WiFi 1010 (link to store).
RGB (Red, Green, Blue)
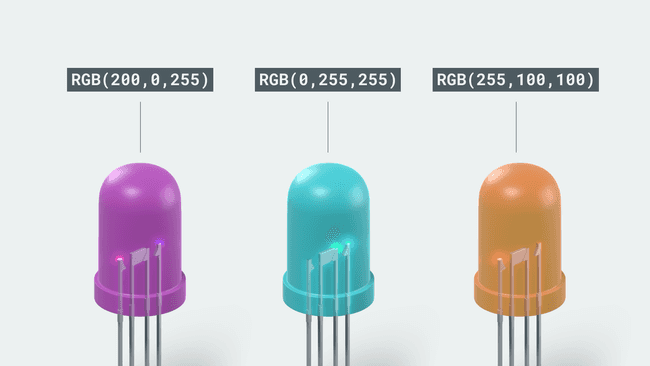
There is a good chance that you have already seen or heard the term RGB. RGB simply stands for Red, Green and Blue, which are the three colors we need to basically create any type of color. An RGB exists of three small LEDs, one red, one blue and one green. Take a look at the image below, and the values. These values represent each of the color, and when we write these values to the component, it magically switches to that color!

The RGB component is used for many different purposes. They can be particularly useful to signify the state of something. For example: if we want to signify that everything is OK, we can simply change the color to green, if there's a minor error we can change the color to yellow, and if there is a major error we can change it to red.
Controlling the Built-in RGB
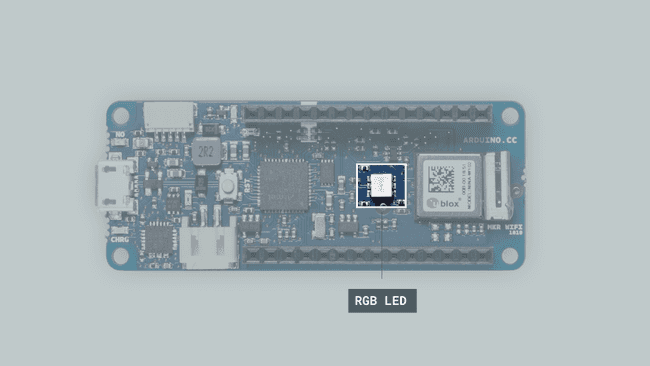
The built-in RGB is located right next to the NINA-W102 Wi-Fi module on the MKR 1010 board.

Controlling the RGB on the MKR WiFi 1010 is slightly different from any previous experiences you might have had with a similar component. First of all, we cannot access it directly, we need to use the functionalities of the WiFiNINA library. More specifically, we need to access a file called
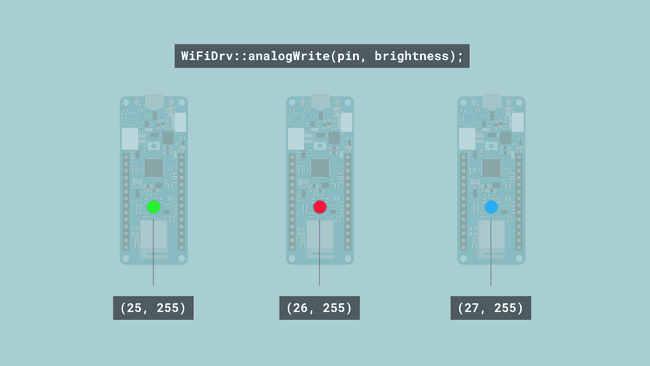
wifi_drv.h1#include <WiFiNINA.h>2#include <utility/wifi_drv.h>After we have included it, it is pretty straightforward. The RGB component uses 25 (green), 26 (red) and 27 (blue), so we need to define those pins by using the following commands:
1WiFiDrv::pinMode(25, OUTPUT); //define GREEN LED2 WiFiDrv::pinMode(26, OUTPUT); //define RED LED3 WiFiDrv::pinMode(27, OUTPUT); //define BLUE LEDPlease note that in some older versions, the green and red LEDs are swapped (pin
and 25
).26
And to control them inside the
loop()1WiFiDrv::analogWrite(25, 255); //GREEN2 WiFiDrv::analogWrite(26, 0); //RED3 WiFiDrv::analogWrite(27, 0); //BLUEOr, if we want to use
digitalWrite()1WiFiDrv::digitalWrite(25, HIGH); //GREEN2 WiFiDrv::digitalWrite(26, LOW); //RED3 WiFiDrv::digitalWrite(27, LOW); //BLUECircuit
This tutorial requires only the MKR WiFi 1010 board. No additional circuit is required.

Programming the Board
1. First, let's make sure we have the drivers installed. If we are using the Web Editor, we do not need to install anything. If we are using an offline editor, we need to install it manually. This can be done by navigating to Tools > Board > Board Manager.... Here we need to look for the Arduino SAMD boards (32-bits Arm® Cortex®-M0+) and install it.
2. Now, we need to install the library needed. If we are using the Web Editor, there is no need to install anything. If we are using an offline editor, simply go to Tools > Manage libraries.., and search for WiFiNINA and install it.
3. We can now take a look at some of the core functions of this sketch:
- includes the WiFiNINA library.#include <WiFiNINA.h>
- includes the#include <utility/wifi_drv.h>
file.wifi_drv.h
- defines the pin as an output.WiFiDrv::pinMode(pin, OUTPUT)
- writes the brightness value to the pin. For example, (27, 127) sets the blue LED to half brightness.WiFiDrv::analogWrite(pin, brightness)
The sketch can be found in the snippet below. Upload the sketch to the board.
1#include <WiFiNINA.h>2#include <utility/wifi_drv.h>3
4void setup() {5 WiFiDrv::pinMode(25, OUTPUT); //define green pin6 WiFiDrv::pinMode(26, OUTPUT); //define red pin7 WiFiDrv::pinMode(27, OUTPUT); //define blue pin8}9
10void loop() {11 WiFiDrv::analogWrite(25, 255);12 WiFiDrv::analogWrite(26, 0);13 WiFiDrv::analogWrite(27, 0);14
15 delay(1000);16
17 WiFiDrv::analogWrite(25, 0);18 WiFiDrv::analogWrite(26, 255);19 WiFiDrv::analogWrite(27, 0);20
21 delay(1000);22
23 WiFiDrv::analogWrite(25, 0);24 WiFiDrv::analogWrite(26, 0);25 WiFiDrv::analogWrite(27, 255);26
27 delay(1000);28
29 WiFiDrv::analogWrite(25, 0);30 WiFiDrv::analogWrite(26, 0);31 WiFiDrv::analogWrite(27, 0);32
33 delay(1000);34}Testing It Out
Shortly after we have uploaded the sketch to the board, we should see the RGB start changing colors. The correct order should be:
- Green.
- Red.
- Blue.
- Off.
At the end of the
loop()0delay(1000)
Troubleshoot
If the code is not working, there are some common issues we can troubleshoot:
- We have not installed the WiFiNINA library.
- We are not using the MKR WiFi 1010 board (only this MKR board has an RGB built in).
Conclusion
In this tutorial we have covered the basics of simply turning ON and OFF an the built-in RGB LED on the MKR WiFi 1010. It can be a very useful tool for signalling the state of something (such as connection, signal strength), or simply if we want to play around with an RGB without having to connect anything.
Suggest changes
The content on docs.arduino.cc is facilitated through a public GitHub repository. If you see anything wrong, you can edit this page here.
License
The Arduino documentation is licensed under the Creative Commons Attribution-Share Alike 4.0 license.