RTC (Real Time Clock) with MKR WiFi 1010 and OLED Display
Learn how to create a simple clock, using RTC and an OLED screen to display the time.
Introduction
In this tutorial, we will learn how to create a simple RTC (Real Time Clock) with the MKR WiFi 1010 board. We will be using the RTCZero library to do so, which works with all the MKR boards. The time and date will then be printed on an 128x32 OLED display, using the SSD1306 library.
Goals
The goals of this project are:
- Create a real time clock.
- Print the date and time on an OLED display.
Hardware & Software Needed
- Arduino IDE (online or offline).
- Adafruit GFX and SSD1306 library.
- RTCZero library.
- Arduino MKR WiFi 1010 (link to store).
- SSD1306 128x32 OLED Screen (other dimensions works but requires some adjusting).
Real Time Clock (RTC)
Isn't Real Time Clock just another word for actual time? The answer is yes, it is actually just the tracking of actual time. But what is interesting is the component that does this. Most electronic devices that need to track current time use an RTC component, often in the form of an Integrated Circuit (IC). They typically consist of a crystal oscillator, which is used to create electronic signals with a constant frequency. The frequency is typically set to 32.768 kHz, which is the same frequency used for most watches.
The frequency is equal to 2^15 cycles per second, which means it is a convenient rate to use for binary counter circuits. This operation also does not require a lot of power, and can still run while the board is in a sleep mode. This can be a quite powerful feature, to for example tell the board to wake up at a certain time, or go to sleep at a certain time, automatically.
You can also read more about Real Time Clocks, if you find this topic interesting.
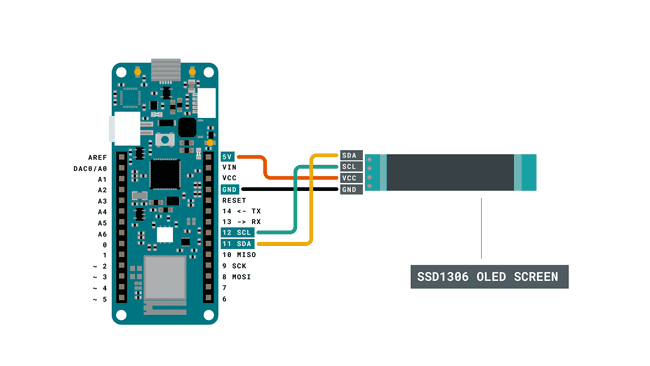
Circuit

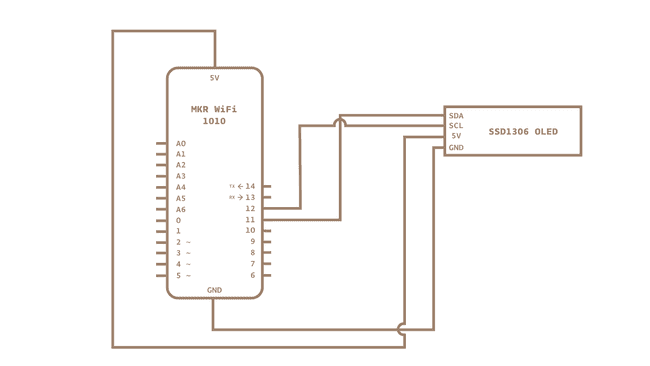
Schematic

Step by Step
We will now get to the programming part of this tutorial. It focuses on two main parts: setting up the RTC, and printing it on an OLED display. Let's take a look at some of the steps we need to do in order to make it work:
- Include the necessary libraries.
- Configure the RTC properties (date, time).
- Configure the OLED display (dimensions, type).
- Initialize the RTC properties (this happens on start).
- Print the time and date on the OLED display.
1. First, let's make sure we have the drivers installed. If we are using the Web Editor, we do not need to install anything. If we are using an offline editor, we need to install it manually. This can be done by navigating to Tools > Board > Board Manager.... Here we need to look for the Arduino SAMD boards (32-bits Arm® Cortex®-M0+) and install it.
2. Now, we need to install the libraries needed. If we are using the Web Editor, there is no need to install anything. If we are using an offline editor, simply go to Tools > Manage libraries.., and search for Adafruit_GFX, Adafruit_SSD1306 and RTCZero.
3. We can now take a look at some of the core functions of this sketch:
- property can represent seconds, minutes, hours, days, month and year.const byte property = x;
- initializes the OLED display.display.begin(SSD1306_SWITCHCAPVCC, 0x3C)
- initializes the RTC library.rtc.begin();
- sets a starting time. "Property" is replaced by a time format, e.g. minute, year.rtc.setProperty();
- retrieves the actual time. "Property" is replaced by a time format, e.g. minute, year.rtc.getProperty()
- clears the OLED display.display.clearDisplay();
- updates the OLED display.display.display();
- custom function that adds a "0" before a digit. E.g. 9.05 becomes 09.05.void print2digits(int number)
In our sketch, there will be six different bytes that stores different time formats, such as minutes and years. We will need to manually fill this in. For example, if we want to set the start time to 09:36 and the date to November 3rd, 2020, we will need to change the bytes to the following:
1const byte seconds = 0;2const byte minutes = 36;3const byte hours = 9;4
5const byte day = 3;6const byte month = 11;7const byte year = 20;With some basic knowledge of the sketch, we can now upload the sketch below to our board. Make sure you select the right board and port before uploading.
Note: Uploading the code to the board takes a few seconds. Try to sync with the time on your computer or watch and allow a couple of extra seconds before starting the uploading process.
1#include <RTCZero.h>2#include <SPI.h>3#include <Wire.h>4#include <Adafruit_GFX.h>5#include <Adafruit_SSD1306.h>6
7#define SCREEN_WIDTH 128 // OLED display width, in pixels8#define SCREEN_HEIGHT 32 // OLED display height, in pixels9
10//Display configuration11#define OLED_RESET 4 // Reset pin # (or -1 if sharing Arduino reset pin)12Adafruit_SSD1306 display(SCREEN_WIDTH, SCREEN_HEIGHT, &Wire, OLED_RESET);13
14/* Create an rtc object */15RTCZero rtc;16
17/* Change these values to set the current initial time */18const byte seconds = 0;19const byte minutes = 36;20const byte hours = 09;21
22/* Change these values to set the current initial date */23const byte day = 03;24const byte month = 11;25const byte year = 20;26
27void setup()28{29 Serial.begin(9600);30
31 if (!display.begin(SSD1306_SWITCHCAPVCC, 0x3C)) { // Address 0x3C for 128x3232 Serial.println(F("SSD1306 allocation failed"));33 for (;;); // Don't proceed, loop forever34 }35
36 rtc.begin(); // initialize RTC37
38 // Set the time39 rtc.setHours(hours);40 rtc.setMinutes(minutes);41 rtc.setSeconds(seconds);42
43 // Set the date44 rtc.setDay(day);45 rtc.setMonth(month);46 rtc.setYear(year);47
48 // you can use also49 //rtc.setTime(hours, minutes, seconds);50 //rtc.setDate(day, month, year);51}52
53void loop()54{55 56 display.clearDisplay(); //clears display57 display.setTextColor(SSD1306_WHITE); //sets color to white58 display.setTextSize(2); //sets text size to 259 display.setCursor(0, 0); //x, y starting coordinates60
61 print2digits(rtc.getDay()); //retrieve day 62 display.print("/");63 print2digits(rtc.getMonth()); //retrieve month64 display.print("/");65 print2digits(rtc.getYear()); //retrieve year66 67
68 display.setCursor(0, 18); //change cursor to second row69 print2digits(rtc.getHours()); //retrieve hours70 display.print(":");71 print2digits(rtc.getMinutes()); //retrieve minutes72 display.print(":");73 print2digits(rtc.getSeconds()); //retrieve seconds74 75 display.display(); //print to display76
77 delay(10);78}79
80
81void print2digits(int number) {82 if (number < 10) {83 display.print("0"); // print a 0 before if the number is < than 1084 }85 display.print(number);86}Testing It Out
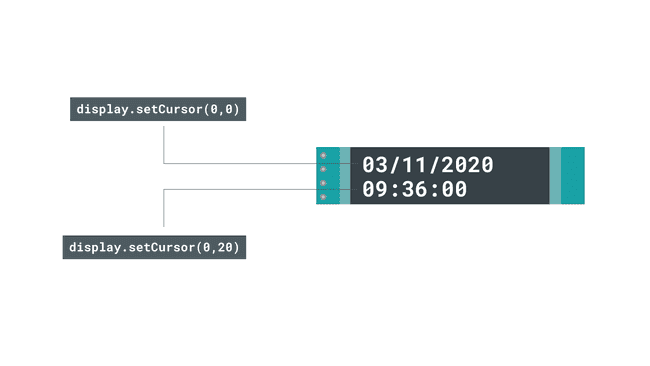
Great job. We should now have an accurate time and date printed on our OLED display, which will be accurate for as long as the board remains powered. If we take a look at the display, we can see that at the top row, the day, month and year is printed. In the second row, seconds, minutes and hours are printed.

Troubleshoot
If the code is not working, there are some common issues we can troubleshoot:
- Check that all libraries are installed.
- Make sure there are no missing curly brackets {}.
- We have not selected the right port and board.
Conclusion
This tutorial covers some basics on RTC and how to print the time and date continuously on an OLED display. But these technologies are used heavily in modern designs, and knowing just the basics can be very beneficial.
Suggest changes
The content on docs.arduino.cc is facilitated through a public GitHub repository. If you see anything wrong, you can edit this page here.
License
The Arduino documentation is licensed under the Creative Commons Attribution-Share Alike 4.0 license.