Arduino Yún Temperature Web Panel
Post sensor data on a webpage when requested by a browser.
This example shows how to serve data from an analog input via the Yún device's built-in webserver using the Bridge library.
Prepare your SD card or USB Flash memory stick with an empty folder in the root named "arduino" and a subfolder of that named "www". This will ensure that the Yún device will create a link to the memory to the "/mnt/sd" path.
In this sketch folder is a basic webpage and a copy of zepto.js, a minimized version of jQuery. When you upload your sketch, these files will be placed in the /arduino/www/TemperatureWebPanel folder on your removable memory.
You can then go to http://arduino.local/sd/TemperatureWebPanel to see the output of this sketch.
You can remove the SD card or USB Flash memory stick while the Linux and the sketch are running but be careful not to remove it while the system is writing to it.
Hardware Required
Yún board or shield
computer and Yún device on the same wireless or wired network
TMP36 temperature sensor on analog pin A1
SD card or USB Flash memory stick
hook-up wies
breadboard
Circuit
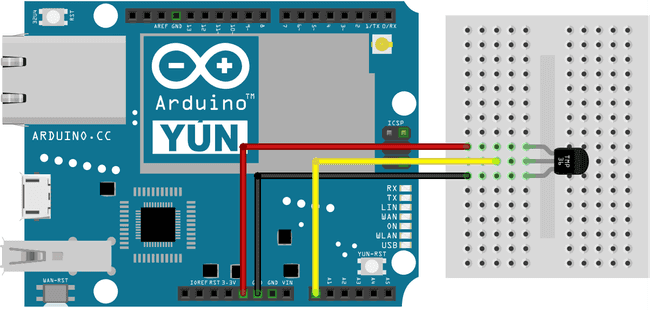
Attach a TMP36 temperature sensor on A1, and insert a micro-SD card into the slot on the Yún or the USB host of the shield.

image developed using Fritzing. For more circuit examples, see the Fritzing project page
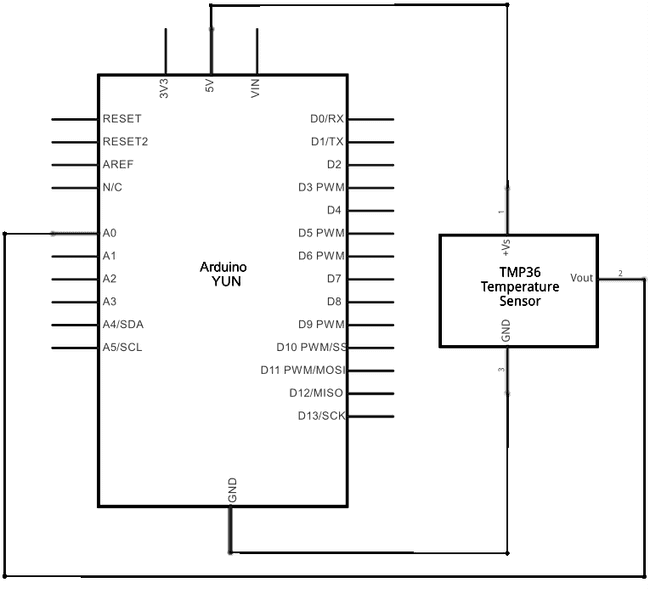
Schematic

image developed using Fritzing. For more circuit examples, see the Fritzing project page
Code
You need to include the Bridge, YunServer, and YunClient libraries :
1#include <Bridge.h>2#include <YunServer.h>3#include <YunClient.h>Instantiate a server enabling the the Yún to listen for connected clients.
YunServer server;Create a string to hold the time the sketch started, and a variable to keep track of the number of times the page has been visited.
1String startString;2long hits = 0;In
setup()1void setup() {2
3 Serial.begin(9600);4
5 pinMode(13,OUTPUT);6
7 digitalWrite(13, LOW);8
9 Bridge.begin();10
11 digitalWrite(13, HIGH);Set A0 and A2 as power and ground for the TMP36 sensor (this helps avoid using a breadboard).
1pinMode(A0, OUTPUT);2
3 pinMode(A2, OUTPUT);4
5 digitalWrite(A0, HIGH);6
7 digitalWrite(A2, LOW);Tell the server to listen for incoming connections only from localhost and start it
1server.listenOnLocalhost();2
3 server.begin();Create an instance of Process to get the time the sketch started by running the
date1Process startTime;2
3 startTime.runShellCommand("date");4
5 while(startTime.available()) {6
7 char c = startTime.read();8
9 startString += c;10
11 }12}In
loop()YunClient client = server.accept();If there is a new client connected, read the command the client sent and print it out.
1if (client) {2
3 String command = client.readString();4
5 command.trim(); //kill whitespace6
7 Serial.println(command);If the command is "temperature", get the current time and read the value of the temperature sensor.
1if (command == "temperature") {2
3 Process time;4
5 time.runShellCommand("date");6
7 String timeString = "";8
9 while(time.available()) {10
11 char c = time.read();12
13 timeString += c;14
15 }16
17 Serial.println(timeString);18
19 int sensorValue = analogRead(A1);Convert the sensor's reading to temperature Celsius :
1// convert the reading to millivolts:2
3 float voltage = sensorValue * (5000/ 1024);4
5 // convert the millivolts to temperature celsius:6
7 float temperature = (voltage - 500)/10;Print the current time, temperature, time the sketch was started, and the number of hits since starting to the connected client with
client.print()1client.print("Current time on the Yun: ");2
3 client.println(timeString);4
5 client.print("<br>Current temperature: ");6
7 client.print(temperature);8
9 client.print(" degrees C");10
11 client.print("<br>This sketch has been running since ");12
13 client.print(startString);14
15 client.print("<br>Hits so far: ");16
17 client.print(hits);18
19 }Close the connection to free up any unused resources and increment the hit counter.
1client.stop();2
3 hits++;4
5 }Pause for a few moments before polling anew
1delay(50); // Poll every 50ms2}The complete code is below :
1/*2
3 Temperature web interface4
5 This example shows how to serve data from an analog input6
7 via the YunShield/Yún built-in webserver using the Bridge library.8
9 The circuit:10
11 * TMP36 temperature sensor on analog pin A112
13 * SD card attached to SD card slot of the YunShield/Yún14
15 This sketch must be uploaded via wifi. REST API must be set to "open".16
17 Prepare your SD card with an empty folder in the SD root18
19 named "arduino" and a subfolder of that named "www".20
21 This will ensure that the Yún will create a link22
23 to the SD to the "/mnt/sd" path.24
25 In this sketch folder is a basic webpage and a copy of zepto.js, a26
27 minimized version of jQuery. When you upload your sketch, these files28
29 will be placed in the /arduino/www/TemperatureWebPanel folder on your SD card.30
31 You can then go to http://arduino.local/sd/TemperatureWebPanel32
33 to see the output of this sketch.34
35 You can remove the SD card while the Linux and the36
37 sketch are running but be careful not to remove it while38
39 the system is writing to it.40
41 created 6 July 201342
43 by Tom Igoe44
45 This example code is in the public domain.46
47 http://www.arduino.cc/en/Tutorial/TemperatureWebPanel48
49 */50
51#include <Bridge.h>52#include <BridgeServer.h>53#include <BridgeClient.h>54
55// Listen on default port 5555, the webserver on the Yún56// will forward there all the HTTP requests for us.57
58BridgeServer server;59
60String startString;61long hits = 0;62
63void setup() {64
65 SerialUSB.begin(9600);66
67 // Bridge startup68
69 pinMode(13, OUTPUT);70
71 digitalWrite(13, LOW);72
73 Bridge.begin();74
75 digitalWrite(13, HIGH);76
77 // using A0 and A2 as vcc and gnd for the TMP36 sensor:78
79 pinMode(A0, OUTPUT);80
81 pinMode(A2, OUTPUT);82
83 digitalWrite(A0, HIGH);84
85 digitalWrite(A2, LOW);86
87 // Listen for incoming connection only from localhost88
89 // (no one from the external network could connect)90
91 server.listenOnLocalhost();92
93 server.begin();94
95 // get the time that this sketch started:96
97 Process startTime;98
99 startTime.runShellCommand("date");100
101 while (startTime.available()) {102
103 char c = startTime.read();104
105 startString += c;106
107 }108}109
110void loop() {111
112 // Get clients coming from server113
114 BridgeClient client = server.accept();115
116 // There is a new client?117
118 if (client) {119
120 // read the command121
122 String command = client.readString();123
124 command.trim(); //kill whitespace125
126 SerialUSB.println(command);127
128 // is "temperature" command?129
130 if (command == "temperature") {131
132 // get the time from the server:133
134 Process time;135
136 time.runShellCommand("date");137
138 String timeString = "";139
140 while (time.available()) {141
142 char c = time.read();143
144 timeString += c;145
146 }147
148 SerialUSB.println(timeString);149
150 int sensorValue = analogRead(A1);151
152 // convert the reading to millivolts:153
154 float voltage = sensorValue * (5000.0f / 1024.0f);155
156 // convert the millivolts to temperature celsius:157
158 float temperature = (voltage - 500.0f) / 10.0f;159
160 // print the temperature:161
162 client.print("Current time on the Yún: ");163
164 client.println(timeString);165
166 client.print("<br>Current temperature: ");167
168 client.print(temperature);169
170 client.print(" °C");171
172 client.print("<br>This sketch has been running since ");173
174 client.print(startString);175
176 client.print("<br>Hits so far: ");177
178 client.print(hits);179
180 }181
182 // Close connection and free resources.183
184 client.stop();185
186 hits++;187
188 }189
190 delay(50); // Poll every 50ms191}Last revision 2016/05/25 by SM
Suggest changes
The content on docs.arduino.cc is facilitated through a public GitHub repository. If you see anything wrong, you can edit this page here.
License
The Arduino documentation is licensed under the Creative Commons Attribution-Share Alike 4.0 license.